
If you followed our previous blog on LangChain fundamentals, you’ve likely built several AI applications using sequential chains. You connect a prompt to an LLM, maybe add a parser, and chain everything together linearly. This works beautifully for straightforward tasks, but what happens when your AI needs to make decisions, loop back to previous steps, or manage complex state across multiple interactions?
That’s where LangGraph comes in. While LangChain excels at linear workflows, real-world AI applications often require branching logic, conditional paths, and stateful interactions that simple chains can’t handle elegantly.
What is LangGraph?
LangGraph is a library for building stateful, multi-actor applications with LLMs. Think of it as LangChain’s more sophisticated cousin – while LangChain handles sequential workflows beautifully, LangGraph manages complex decision trees, loops, and stateful interactions.
The key difference lies in how they handle flow control. LangChain moves data through a pipeline linearly, while LangGraph creates a directed graph where your application can branch, loop, and maintain state across interactions. This makes it perfect for applications like customer service bots that need to remember conversation context, debugging assistants that iterate through solutions, or research agents that explore multiple paths simultaneously.
Core LangGraph Concepts
Nodes and Edges
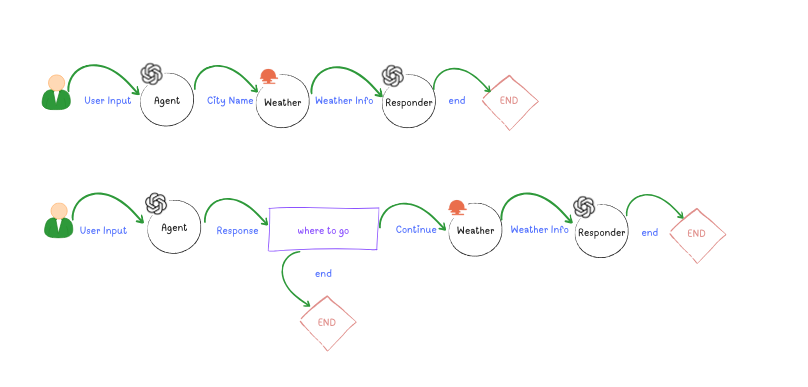
In LangGraph, nodes represent individual steps or functions in your workflow, while edges define how information flows between them. Unlike LangChain’s sequential chains, edges can be conditional, creating dynamic paths based on your application’s logic.
State Management
LangGraph maintains a shared state object that persists across your entire workflow. This stateful approach enables complex interactions that would be cumbersome with stateless chains. Your application can remember previous decisions, accumulate information, and make context-aware choices.
Conditional Flows
The real power of LangGraph emerges through conditional routing. Your application can examine the current state and choose different paths dynamically. This enables sophisticated patterns like retry logic, multi-step validation, and adaptive workflows.
When to Choose LangGraph vs LangChain
Understanding when to use each tool prevents over-engineering simple solutions while ensuring complex requirements are met effectively.
Use LangChain for:
- Linear data processing workflows
- Simple question-answering systems
- Straightforward document analysis
- Basic RAG (Retrieval-Augmented Generation) implementations
- Prototyping and proof-of-concept development
Use LangGraph for:
- Multi-step reasoning that requires backtracking
- Applications needing conversation memory
- Workflows with conditional logic and branching
- Multi-agent systems with coordination
- Applications requiring error handling and retry mechanisms
- Complex decision-making processes
The decision framework is simple: if your workflow needs to “think” about what to do next based on previous results, choose LangGraph. If you’re processing data in a predictable sequence, LangChain remains the better choice.
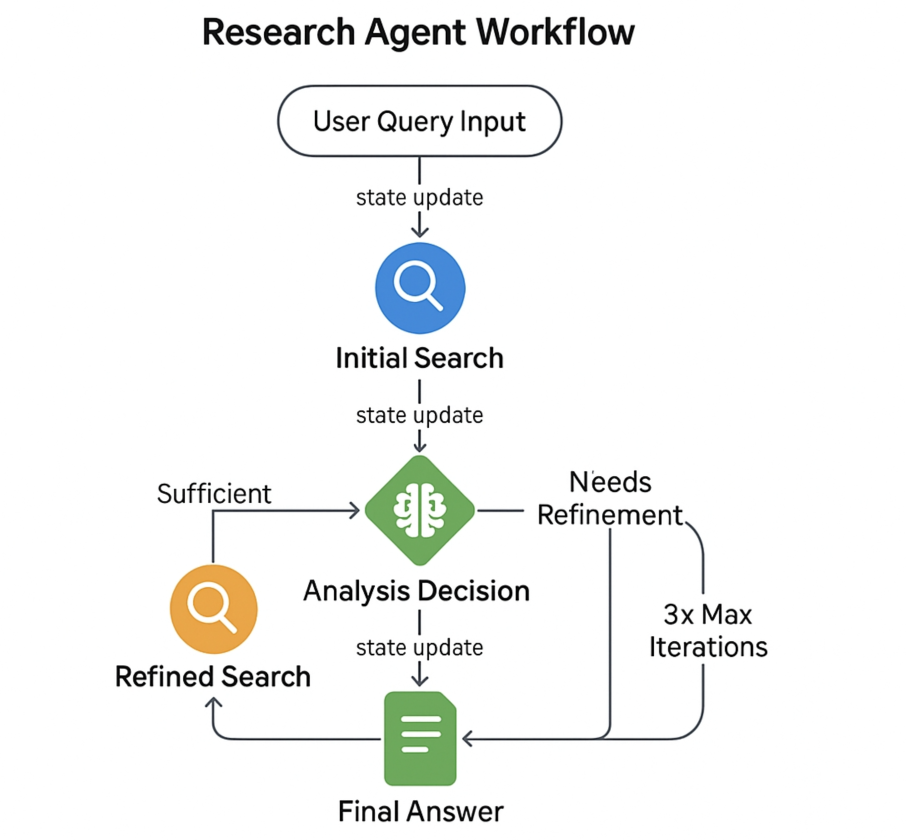
Practical Implementation: Building a Research Agent
Let’s build a research assistant that demonstrates LangGraph’s power through iterative search refinement – something that would be awkward with linear chains but elegant with graph workflows.
Step 1: Setting Up Dependencies and State
First, we’ll import the necessary libraries and define our state structure. The state acts as our workflow’s memory, persisting information across all steps.
from langgraph.graph import Graph, END
from langchain_community.llms import OpenAI
from langchain_community.tools import DuckDuckGoSearchRun
from typing import TypedDict, List

# Set your OpenAI API key
api_key = "Your-API-Key"

# Define our state structure - this persists across all nodes
class ResearchState(TypedDict):
    query: str
    search_results: List[str]
    refined_query: str
    final_answer: str
    iteration_count: int
The ResearchState structure defines what information our workflow will track and maintain throughout the research process.
Step 2: Initialize Tools with Error Handling
Next, we’ll set up our LLM and search tools with proper error handling – crucial for production applications.
try:
    # Initialize tools
    llm = OpenAI(api_key=api_key, temperature=0)
    search = DuckDuckGoSearchRun()
except Exception as e:
    print(f"An error occurred during setup: {e}")
Using temperature=0 ensures consistent, deterministic responses from the LLM, which is important for our decision-making logic.
Step 3: Creating the Initial Search Node
Our first node performs the initial search and updates the state with results.
def initial_search(state: ResearchState) -> ResearchState:
    """Perform initial search based on user query"""
    try:
        results = search.run(state["query"])
        return {
            **state,  # Preserve existing state
            "search_results": [results],
            "iteration_count": 1
        }
    except Exception as e:
        print(f"Error during initial search: {e}")
        return {
            **state,
            "final_answer": f"Error during search: {str(e)}"
        }
Notice how we use the spread operator (**state) to preserve existing state while updating specific fields.
Step 4: Building the Analysis Node
This node decides whether our search results are sufficient or if we need to refine our query.
def analyze_results(state: ResearchState) -> ResearchState:
    """Analyze search results and determine if refinement is needed"""
    if "final_answer" in state and state["final_answer"].startswith("Error"):
        return state

    prompt = """
    Original query: {state['query']}
    Search results: {state['search_results'][-1]}

    Are these results sufficient to answer the query?
    If not, suggest a refined search query.
    Respond with either 'SUFFICIENT' or 'REFINE: [new query]'
    """

    try:
        response = llm.predict(prompt)

        if response.startswith('REFINE:'):
            refined_query = response.split('REFINE: ')[1]
            return {
                **state,
                "refined_query": refined_query
            }
        else:
            # Generate final answer from accumulated results
            answer_prompt = """
            Query: {state['query']}
            Research results: {' '.join(state['search_results'])}

            Provide a comprehensive answer based on the research: """
            final_answer = llm.predict(answer_prompt)
            return {
                **state,
                "final_answer": final_answer
            }
    except Exception as e:
        print(f"Error during analysis: {e}")
        return {
            **state,
            "final_answer": f"Error during analysis: {str(e)}"
        }
This node showcases LangGraph’s decision-making capability – it can choose to either generate a final answer or continue refining the search.
Step 5: Creating the Refinement Node
When the analysis determines we need better results, this node performs a refined search.
def refined_search(state: ResearchState) -> ResearchState:
    """Perform refined search and update results"""
    try:
        new_results = search.run(state["refined_query"])
        updated_results = state["search_results"] + [new_results]

        return {
            **state,
            "search_results": updated_results,
            "iteration_count": state["iteration_count"] + 1
        }
    except Exception as e:
        print(f"Error during refined search: {e}")
        return {
            **state,
            "final_answer": f"Error during refined search: {str(e)}"
        }
Notice how we accumulate search results rather than replacing them, building a comprehensive knowledge base.
Step 6: Implementing Flow Control
This routing function determines whether to continue refining or finish the research process.
def should_continue(state: ResearchState) -> str:
    """Decide whether to continue refining or finish"""
    if "final_answer" in state and state["final_answer"]:
        return END
    elif state["iteration_count"] >= 3:
        return END  # Prevent infinite loops
    else:
        return "refined_search"
The iteration limit prevents infinite loops – a crucial safeguard in production workflows.
Step 7: Building and Connecting the Graph
Now we assemble all our nodes into a coherent workflow graph.
# Build the graph
workflow = Graph()

# Add nodes
workflow.add_node("initial_search", initial_search)
workflow.add_node("analyze_results", analyze_results)
workflow.add_node("refined_search", refined_search)

# Add edges - define how information flows
workflow.add_edge("initial_search", "analyze_results")
workflow.add_conditional_edges(
    "analyze_results",
    should_continue,
    {
        "refined_search": "refined_search",
        END: END
    }
)
workflow.add_edge("refined_search", "analyze_results")

# Set entry point and compile
workflow.set_entry_point("initial_search")
research_agent = workflow.compile()
The conditional edges are where LangGraph shines – enabling dynamic routing based on our application logic.
Step 8: Running the Complete System
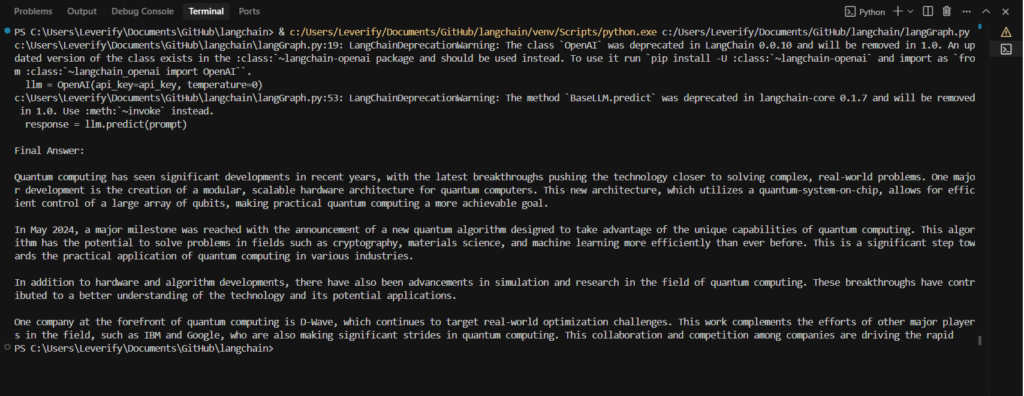
Finally, let’s see our research agent in action.
if __name__ == "__main__":
    initial_state = ResearchState(
        query="What are the latest developments in quantum computing?",
        search_results=[],
        refined_query="",
        final_answer="",
        iteration_count=0
    )

    result = research_agent.invoke(initial_state)
    print("\nFinal Answer:")
    print(result["final_answer"])
Output
This example showcases LangGraph’s core capabilities: state management across multiple validation steps, conditional routing based on quality scores, and the ability to handle complex decision logic that would require awkward workarounds in linear chains.
Real-World Use Cases
Customer Support Automation
LangGraph excels at building customer service bots that remember conversation context, escalate complex issues appropriately, and follow company-specific resolution procedures. The stateful nature allows the bot to track issue resolution progress and provide consistent experiences across multiple interactions.
Code Review and Debugging
Development teams use LangGraph to create automated code review systems that can analyze code, suggest improvements, run tests, and iteratively refine solutions based on test results. The conditional logic enables sophisticated debugging workflows that adapt to different types of issues.
Content Creation Pipelines
Publishing companies leverage LangGraph for multi-stage content creation workflows. The system can generate initial drafts, perform fact-checking, suggest improvements, and coordinate between different AI agents responsible for writing, editing, and optimization.
Research and Analysis Workflows
Academic and business research applications use LangGraph to conduct systematic literature reviews, cross-reference sources, and build comprehensive reports. The ability to branch and merge research paths makes it ideal for complex analytical tasks.
Getting Started: Installation and Setup
Ready to try LangGraph yourself? Here’s how to get started:
pip install langgraph langchain openaiThe content validation example above demonstrates the fundamental LangGraph workflow pattern you’ll use in most applications:
- Define your state structure – Plan what information needs to persist
- Create node functions – Each handles one specific task
- Build the graph – Connect nodes with edges and conditional logic
- Compile and run – Execute your workflow with initial state
Start by adapting the validation example to your specific use case. The pattern of check → decide → route is incredibly versatile and applies to many real-world scenarios.
Common Mistakes to Avoid
Over-complicating Simple Workflows: Don’t use LangGraph for straightforward linear processes. If your workflow doesn’t need conditional logic or state management, stick with LangChain chains.
Ignoring State Design: Poorly designed state structures lead to confusing workflows. Plan your state schema carefully before building your graph.
Missing Loop Prevention: Always include mechanisms to prevent infinite loops in conditional workflows. Set maximum iteration counts or explicit termination conditions.
Neglecting Error Handling: LangGraph workflows can fail at multiple points. Implement proper error handling and recovery mechanisms for production applications.
Forgetting Debugging: Complex graphs can be difficult to debug. Use LangGraph’s visualization tools and add logging to understand workflow execution.
Next Steps in Your LangGraph Journey
Now that you understand LangGraph fundamentals, consider exploring advanced patterns like multi-agent coordination, persistent state management, and integration with vector databases for RAG applications. The LangGraph ecosystem continues evolving rapidly, with new features and patterns emerging regularly.
Building on your LangChain foundation, LangGraph opens doors to sophisticated AI applications that can think, decide, and adapt. Start with simple conditional workflows and gradually incorporate more complex patterns as your confidence grows.
The transition from linear chains to graph workflows represents a significant step toward building truly intelligent applications. Your existing LangChain knowledge provides a solid foundation – LangGraph simply adds the decision-making and memory capabilities that complex applications require.
Ready to bring AI innovation to your organization? Veritas Analytica specializes in custom AI development and implementation services. Book a meeting with us to discover how we can create tailored solutions for your specific business challenges.