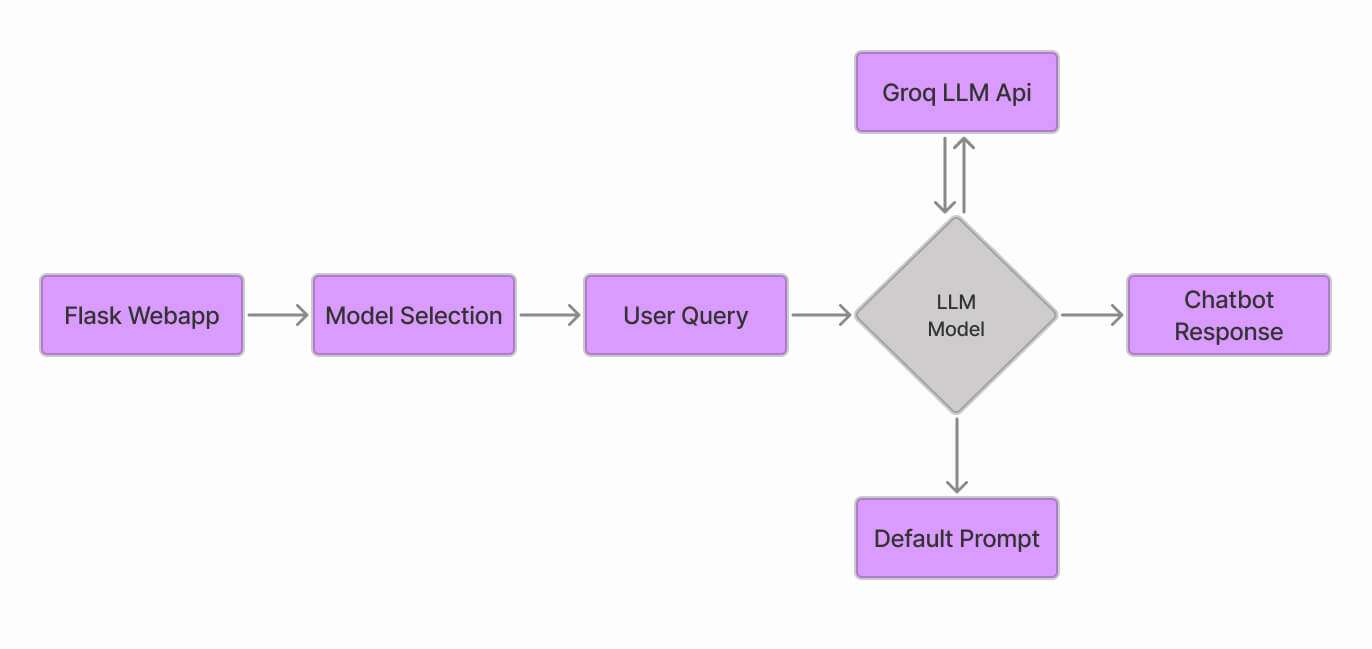
In today’s tech-savvy world, chatbots powered by Large Language Models (LLMs) are changing the game with their human-like interactions, driving a market expected to exceed $10 billion by 2025. This guide will help you build your own chatbot from scratch using Flask, Groq, and LLMs.
With 67% of consumers already using chatbots for quick and seamless interactions, and 86% reporting positive experiences, automated assistants have become essential in modern business.
They now handle 65% of business-to-consumer communications, engage over 600 million global shoppers annually, and are projected to save businesses over $11 billion in transaction costs by 2023. It’s perfect for beginners looking to dive into the exciting and rapidly growing world of chatbot development.
What are Large Language Models
Large Language Models (LLMs) are advanced tools designed to understand and generate human language. Built with deep learning techniques and trained on vast datasets, LLMs use billions of parameters to capture language patterns and context. This allows them to produce text that feels natural and relevant. When given a prompt, LLMs analyze it and generate coherent responses based on their extensive training.
Popular LLMs
What is Groq?
Groq is a company that offers fast and efficient AI solutions with their LPU™ (Latency Processing Unit) technology. Based in Silicon Valley, Groq designs and manufactures its products in North America. Their technology is used to speed up AI tasks, making real-time applications possible.
GroqCloud™, where developers can build and deploy AI models easily. In addition to their technology, GroqCloud™ supports different large language models (LLMs) like LLaMA and Gemini, which can be integrated into various applications. When using Groq’s LLM API, you have several settings to customize how the models work:
- temperature: Adjusts how creative or varied the responses are, with higher settings making the output more interesting and diverse.
- max_tokens: Sets a limit on how long the response can be, up to 8192 tokens (which can be words or parts of words).
- top_p: Controls how many possible responses are considered, with 1 including all options.
- stream: Lets you receive responses as they are generated, so you don’t have to wait for the entire response to be complete.
- stop: Means there’s no specific endpoint for the response, allowing it to finish based on other settings or defaults.
What is Flask?
Flask is a simple and flexible tool for building websites and web apps using Python. It’s easy to use and helps you get your projects up and running quickly, whether you’re creating a small site, a web app, or a prototype. Flask provides the basic features you need without unnecessary complexity, making it a great choice for both beginners and experienced developers.
Steps to Make LLM Chatbot with Flask Framework and Groq API
Step-by-step implementation of the chatbot, we’ll use Groq API for LLM models, which are [‘llama3-70b-8192′,’llama3-8b-8192′,’mixtral-8x7b-32768′,’gemma2-9b-it’] and a flask application for interaction with chatbot.

Step#1: Installing the required libraries
pip install flask
pip install groq
pip install requests
Step#2: Set-up a simple flask app folder
GroqFlask/
│   ├── main.py
│   ├── templates/
│   │   └── index.html
│   └── static/
│       ├── css/styles.css
Step#3: Import libraries in .py file
#Import Libraries
from flask import Flask, render_template, request
from groq import Groq
Step#4: Initialize app and API
<!-- wp:code -->
<pre class="wp-block-code"><code>app = Flask(__name__)

# Define available models with model names and Groq Api
MODELS = {
    'Llama3 70b': 'llama3-70b-8192',
    'Llama3 8b': 'llama3-8b-8192',
    'Mixtral': 'mixtral-8x7b-32768',
    'Gemma2': 'gemma2-9b-it'
}
groq_api_key = "YOUR GROQ API HERE"
# Initialize the Groq client with the API key
client = Groq(api_key=groq_api_key)
</code></pre>
<!-- /wp:code -->
Step#5: Route to display the page
# Home route to display
@app.route('/')
def index():
    return render_template('index.html', models=MODELS)
Step#6: Model form with function of chatbot
# Route to handle form submission
@app.route('/select_model', methods=['POST'])
def select_model():
    selected_model = request.form.get('model')
    input_text = request.form.get('input_text')
    if not selected_model or not input_text:
        return "Please select a model and provide input text.", 400
    # Get the selected model ID from the MODELS dictionary
    model_id = MODELS[selected_model]
# Make a request to the Groq API using the selected model
    Try:
        completion = client.chat.completions.create(
            model=model_id,
            messages=[
                {"role": "system", "content": "User chatbot"},
                {"role": "user", "content": input_text}
            ],
            temperature=1,
            max_tokens=1024,
            top_p=1,
            stream=True,
            stop=None,
        )
        # Collect the streamed response
        result = ""
        for chunk in completion:
            result += chunk.choices[0].delta.content or ""
    except Exception as e:
        return f"An error occurred: {e}", 500
    # Render the index.html template with the results
    return render_template('index.html', models=MODELS, model=selected_model, input_text=input_text, result=result)
Step#7: Set Up an HTML page’s request input section
<form action="{{ url_for('select_model') }}" method="POST">
  <label for="model">Choose a Model:</label>
                <select name="model" id="model" required>
                <option value="" disabled selected>Select a model</option>
                    {% for model_name in models %}
                <option value="{{ model_name }}">{{ model_name}}</option>
                    {% endfor %}
                </select>
                <label for="input_text">Enter Input Text:</label>
                <textarea id="input_text" name="input_text" rows="4" cols="50" required></textarea>
                <button type="submit">Submit</button>
            </form>
Step#8: Set Up an HTML page`s Output section
{% if result %}
        <div class="result-container">
            <h1>Selected Model: {{ model }}</h1>
            <p><strong>Input Text:</strong> {{ input_text }}</p>
            <p><strong>Result:</strong> {{ result }}</p>
        </div>
        {% endif %}
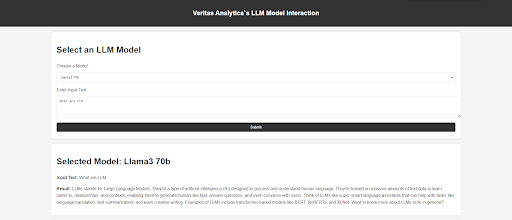
Hands-on Experience of Bot

Conclusion
The Large Language Models chatbot is revolutionizing many industries with its ability to converse like a human being. With domain-specific prompt modification, it can be utilized as a domain-specific chatbot. In this step-by-step guide, we have learned how to create a free LLM web domain-specific app using Flask.
For expert assistance in developing a tailored chatbot solution for your website, please visit Veritas Analytica. We offer a free consultation to discuss your specific needs and explore how our solutions can enhance your digital strategy.


